Friday, August 3, 2012

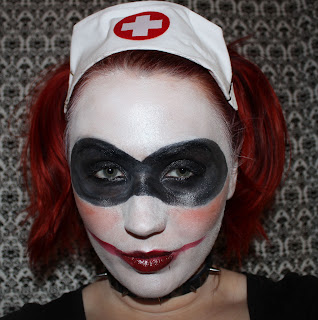
Harley Quinn Look

I recently went to see the new Batman movie and it was phenomenal! One thing that disappointed me about the newer movies though was that they never featured one of my FAVORITE  Batman characters Harley Quinn. So I decided to try out a Harley Quinn look!

Face Products:
 Ben Nye Professional Wheel in White

Mask:
Ben Nye Professional Wheel in Black
NYX Jumbo Eye Pencil in Black Bean
Kat Von D Monastery Eyeshadow

Blush:
Tarte Maracuja Airblush in Shimmering Poppy

Lips:
Limecrime Styletto
Limecrime Glamour 101


                                   I like the smeared lipstick looks too, so I tried that out too...

Friday, July 20, 2012

My Favorite Brushes- MAC 130

So I've been super busy lately trying to pack our house up and sell the rest, but I am working on getting back to posting more :)

During my Chicago trip a few months ago, I picked up a new brush at the MAC store- the 130 short duo-fiber brush:


My normal daily brush for powder and foundation is the MAC 187- This is basically just a shorter denser version of the 187 and I have to say it is AMAZING!


I've found that it is perfect for thick foundations and concealers and gives a good heavy coverage.


The 130 is pretty pricey at $42, but I LOVE it and couldn't live without it!


If you don't want to shell out $42, Sephora Professionals makes a really good substitute- the 45 mineral powder brush.


I've found that it  is too dense to use with mineral powder- it just puts it on way too cakey, but it is perfect for thick foundations and concealers.


This one you can get for $26 from Sephora.

Friday, June 22, 2012

Contest Winner and Stila- The Box that Rocks!

I have FINALLY got around to inputting all of the names in excel and choosing the winner of the $20 giftcard! And it is Kim from A Very Sweet Blog (I will email the card number tonite)!!!!


I'm still rashing out lately and it has unfortunately spread to my face, so it will be a while before I do any makeup posts :-x

Anyway, a few days ago, I came home to a package on my doorstep and was super excited to find out that it was my order from my sponsor Apothica! A while back I happened to see something on my Facebook newsfeed called Stila- The Box that Rocks. The name by itself immediately got my attention! So what is this you ask???


It's a makeup case with speakers so that you can plug your iPhone or MP3 player into it! This would have been PERFECT for times that I have done makeup for my friends!


It is roomy enough so that you should be able to fit the makeup that you would need to take with you on a trip or to apply on a client.


 It comes with the case, a lip glaze trio in warm, smudge stick waterfproof eyeliner in Lionfish and eyeshadow trio in Gilded.


It costs $50 at Apothica which is an amazing deal considering that the eyeshadow and eyeliner alone each cost $20, and the lip glaze trio is $12!

Thursday, June 14, 2012

New Hair and Going Out Look

I've been broken out in hives and nasty peely face skin for the past several weeks, so I've just kind of bummed it for a while now! I thought it was time to try and look semi-decent for date night with the husband tonite though!


Because my eyes are so peely right now, I can only use cream based eyeshadows (and it still doesn't turn out great!) which sucks as I own all of 2 cream shades! But I used Beloved by Victoria's Secret which is actually pretty good! For the cheeks I used MUFE sculpting blush in 22. On the lips I used Illmasqua gloss in Indulge which is SUPER intense, so I toned it down with MAC Lipglass in Viva Glam Gaga 2.


The lovely leopard scarf was actually sent to me via Fraas. I am a HUGE fan of scarves and you can never go wrong with leopard print! You can get it for $40 at http://www.fraas.com/.

Friday, June 8, 2012

NOTD: Butter London- Henley Regatta

Lately I've been really impressed with Butter London. It's 3 free and tends to last longer than other nail polish brands.


I'd seen Henley Regatta for a while and was really excited to see that Ulta had it in stock recently!


Unfortunately, I was not really impressed with this shade. In the bottle, it looks like a gorgeous pigmented teal color. In reality though, it is a glitter with not much pigmentation and it flaked off of my nails within a few days :(

Thursday, June 7, 2012

DIY Sugar Scrub


What can you make with granulated white sugar and Dawn dish soap with Olay Hand Renewal???


                                                    The simplest sugar hand scrub ever!

                                       Step 1:
                                       Fill your container about 3/4 full with sugar.

                                       Step 2:
                                       Fill it the rest of the way with Dawn/ Olay Hand Renewal.

                                       Step 3:
                                       Stir together until it has a thick, icing -like consistency.
                                            (Make sure that the sugar isn't fully dissolved)


 I know this isn't the greenest recipe (I'm working on making some of those!), but it is super simple and works so well!


                              I made this for Mother's Day for my mom as she has super dry cracked hands!

Update: She has been using this scrub for over a month now and said that her hands are no longer cracking  and that they are much more moisturized now!


Tuesday, June 5, 2012

I feel so old!

It's been a super busy past few weeks- Last week my little sister graduated high school! That definitely makes me feel pretty old! It feels like yesterday she was just a little stick thing in elementary school and now she's going to college and I found out she has her own blog too!

I recently got a hat in the mail to review from a company called Dorfman Pacific.


While I think that it is a nice beachy hat, I just dyed my hair SUPER fire cherry red (pictures coming soon!) and thought that it would massively clash with my hair so I gave it to my sister to try out.

                           
                                                  Here she is making her little sour face!

Anyway, you can find this hat here for $30 and until June 30th using the promo code SunHatSave20 will get you 20% off your order!

Also, I will be ending my giveaway at the end of the week so be sure to enter if you haven't!

Thursday, May 10, 2012

FOTD/ My first pincurls attempt!

After prowling about on Youtube for quite a while, I decided to give pincurls a try. I am really lazy with my hair for some reason and it doesn't like heated curls too much so I thought that pincurls might be the thing for me!

This is how my first attempt turned out:


The whole process took maybe 10 minutes the night before, so I definitely think I will be trying it out more in the future!


Since pincurls are so absolutely 50's, I decided to match my makeup to that whole look too. (This picture was taken after my 8 hour shift at work so it's definitely not as good as it started out!)

I usually have a hard time wearing red lipsticks, but I recently found this shade called Healthy Lips by Laura Gellar and LOVE it!

Wednesday, May 9, 2012

Giveaway!

I am extremely excited to announce that I am being sponsored by SkinCareRX!

To kick off the sponsorship, they are allowing me to give away a $20 giftcard which can be used at SkinCareRX, Apothica or SkinBotinca! SkinCareRX carries some of the best hand lotions. What are your favorite products?

To enter the contest you must:

1. Be a follower via GFC or Bloglovin'
2. Post a link to your favorite product from either SkinCareRX, Apothica or SkinBotinca
3. Post your email (If you are uncomfortable with this you can email it to me)

For extra entries you can:

1. Follow me on Twitter- +1
2. Like me on Facebook- +1
3. Post or tweet about this giveaway +2

Wednesday, April 25, 2012

Titanic Rose Look

I normally do not like these types of movies, but for some reason I am a MASSIVE fan of Titanic! So of course when they re-released it in theaters in 3D I had to go see it! (FY-I I couldn't even tell it was in 3D they did such a terrible job with that part!)

I absolutely love Rose- her costumes are fabulous, she looks gorgeous and her skin is perfect, so I thought it would be fun to do a Rose look!


Since her face is flawless and I have hundreds of freckles, I used Make Up For Ever concealer as foundation all over my face with my Dinair paramedical airbrush solution. (Somehow after all of that you can STILL see my freckles a bit!)


Blush: Hard Candy- Pin Up
Brows: Anastasia Brow Filler
Eyes: Too Faced Velvet Revolver- on enitre lid
          Too Faced Lap Dance- in crease
          Mary Kay Eyeliner in Deep Brown
          Benefit Mascara- They're Real
I absolutely love her lipstick, but I have no idea what it is and haven't really seen anything like it, so I mixed several things together to try and come somehat close.
Lips: NARS Lip Pencil in Belle Du Jour
         NYC Lipstick in Rose Petal
         Mary Kay Lipstick in Pink Shimmer

Monday, April 23, 2012

How to Cover a Tattoo

I recently started QC Makeup Academy, and one of the assignments was to cover up a blemish. As I cover up blemishes on my own face everyday, I thought something a little more challenging would be in order and asked my friend Julie to let me try and cover her tattoo.

The tattoo:


Step One

I first primed the area and used a light colored cream concealer from my Make Up For Ever palette. This takes the edge off the dark colors though you can still see the outline pretty clearly.


Step Two
On top of the cream concealer, I stippled Kat Von D's Tattoo concealer in several layers. This largely covered the tattoo, but you could still very faintly see it so I decided to use a third step.


Step Three

Lastly, I sprayed it with my Dinair airbrush machine using the special paramedical solution and tried to blend the area so that it wasn't an obvious patch of concealer.


After:


Friday, April 20, 2012

Chicago Trip FOTD

Last weekend, I had a shopping weekend in Chicago with a friend. The shopping was AMAZING and I bought way too much at the MAC and Sephora stores! I don't know how Sephora always has this effect on me, but I walked in looking for Kat Von D's tattoo concealer and left with a MUFE concealer, blush, 4 lipsticks and 2 lipliners!

This is one of the looks that I tried out using some of the new stuff I got:


I will definitely have lots of swatches later on, but I am obsessed with the lipstick that I'm wearing here called Up the Amp from MAC! I think that it is probably my all time favorite lipstick!


 Later in the day, we went to the observatory in the John Hancock building. By then I was super exhausted from all of the shopping and looked like crap, but the view was worth it!


Thursday, April 12, 2012

MAC Call Me Bubbles Swatches

I recently went on vacation to Florida and I was BEYOND excited to find out that there was a MAC counter at the Macy's there! Before that, it had been 2 years since I had been in a MAC store so this was super exciting!

The one thing that caught my eye most was the MAC Call Me Bubbles palette.


I thought that the other shades were okay, but the one that really drew me in was the one in the bottom right corner- Brash and of course it was available ONLY in this palette!


From top to bottom, the shades are: Call Me Bubbles (This is the sheer white one, so you can't really see it much), Fresh Daily, Full of Flavour and Brash

Overall, I like this palette. I wish that I could have just gotten Brash, but the other colors are pretty as well.

Tuesday, April 10, 2012

Depotting 101- Palette Edition

Lately I've been in a depotting frenzy! My makeup has slowly and surely overtaken all of my available space and more, so I began to look for other storage options and I found depotting to be the best.

So without further ado, here is Depotting 101- Palette Edition!

You will need:
-A flatiron
-Wax paper
-Tweezers or cuticle scissors
-Labels and magnetic strips
-An empty magnetic palette such as Z Palettes or MAC empty palettes (I personally prefer the Z palettes)
-Makeup palettes to depot

Step One
Get your palette's out and ready to depot.


Step Two
If there are any extra parts on the palette, remove them before heating the palette.


Step 3
Heat your flat iron to the hottest setting. Put a sheet of wax paper over the heating plate and set the part of the palette that contains the metal pots directly on the heating plate. Leave the palette on for about a minute, until the glue is heated and tacky.


Step 4
Remove the palette from the flatiron and using the tweezers or cuticle scissors, you should be able to easily pry the metal pans up. Be VERY careful with this step as the metal pans will be extremely hot- I burned my fingertips and still have scars from a depotting session I did a month ago!


Step 5
Adhere the magnet and a label to the bottom of each pan.


Step 6
Arrange the pans however you want to in your palette!


I have to say that depotting my makeup has made my life SO MUCH EASIER! Instead of having masses of containers everywhere taking up lots of room, I now have 7 Z-Palettes organized by color and can actually see all of the makeup that I have.

Here's a tip though- I depotted my Urban Decay Anniversary palette and most of the shadows died on the way out :(   So any palettes that use a hard plastic may be better to not depot.

Monday, April 9, 2012

Life Changes/ A Preliminary Review of QC Makeup Academy

So, I realized the other day that it had been exactly a month since I've been on here. I had been feeling really depressed and not doing much of anything for a while, but since then I have made some big life decisions. One thing I have realized was that my current path in college was not making me happy, and I have since decided that as soon as I am financially able to I will be going to esthetics school! Because esthetics school will be pretty much like a full time job, this will probably be a while so I decided that I was going to occupy myself with QC Makeup Academy until then.

I've been seeing ads for QC Makeup Academy for some time and I thought that it would be fun to try out. I enrolled in the Makeup Artistry course which costs $1198 and includes 4 units.

In my kit, I got:

-A product application guide


-Eco-Beautiful by Lina Hanson


-4 makeup palettes: 1 with lip shades, concealers, blush and eyeshadows similar to the Coastal Scents palettes


-4 sets of booklets for each unit


-And six cd's (which I can't find at the moment) with assignment forms and videos


Right now, I have only finished Unit A.


Unit A went over the basics- your goals and why you want to be a makeup artist, basic expectations and requirements of the makeup artist field, how to build your kit, safe and sanitary practices and how to build your business. After I submitted the set of assignments, I got detailed feedback from one of their instructors after a week.

So far, I haven't really learned anything that I didn't know already. However, it's just the first unit so I expect that it will get harder as I go on. There have been several questions that I have had and they have gotten back to me quickly, so the customer service is excellent. In terms of the videos, I haven't been blown away, but hopefully that will get better as I go on as I'm not really very far in.

Overall I haven't been blown away by this course. Pretty much everything I've seen or done are things that I could have watched on Youtube videos. I have high hopes though that the future units will be better.